


Tools Required:
- Your computer
- Data connection (internet access)
- Money (the money you will pay to host your website)
If you have provided the above required tools, let’s start!
With your computer, go to wampserver.com or you can Google search
it with the keyword “wampserver” and download the version of “wamp” that suits your system OS. If you try downloading from their official website
and you encountered any issue, you can download the “wamp software” from third party websites
by Google searching “WAMPSERVER for PC” as your keyword. For example I’m running windows 10 64bit, so I
will download “wamp server 3.2 64bit”. This is the latest version as of early 2020.
After your download, install the software via normal process of installing other Windows software.
Now go to Wordpress.org and download the latest Wordpress.
Now go to Wordpress.org and download the latest Wordpress.

Click on “Get WordPress” as shown in the above image to
download the Wordpress. The downloaded Wordpress file is normally in a zip
file, so you need to extract it before you can use it.
“If you don’t have any software that can be used to extract files that are zipped, search for one and download. For example Google search “winrar software”, download and install it in your computer system. Once you are done with this, you can continue with the steps below”
Now extract the WordPress file to c:\\wamp64\www now rename the folder to “step”, for this tutorial/article we are designing a website for “step”.
Start the “wamp server” (I mean open the wamp server software) and go to your browser
and type
 |
WAMPSERVER homepage
|
At the bottom left corner select

See the details as I filled it out in the above image.
After you have filled the necessary information in the “add a virtual host”, go
back to Homepage and select “phpmyadmin” at the bottom left corner – you can see it under “TOOLS”.
NOW IT’S TIME TO
SELECT A DATABASE

Select

Now type on your browser http://step.local/

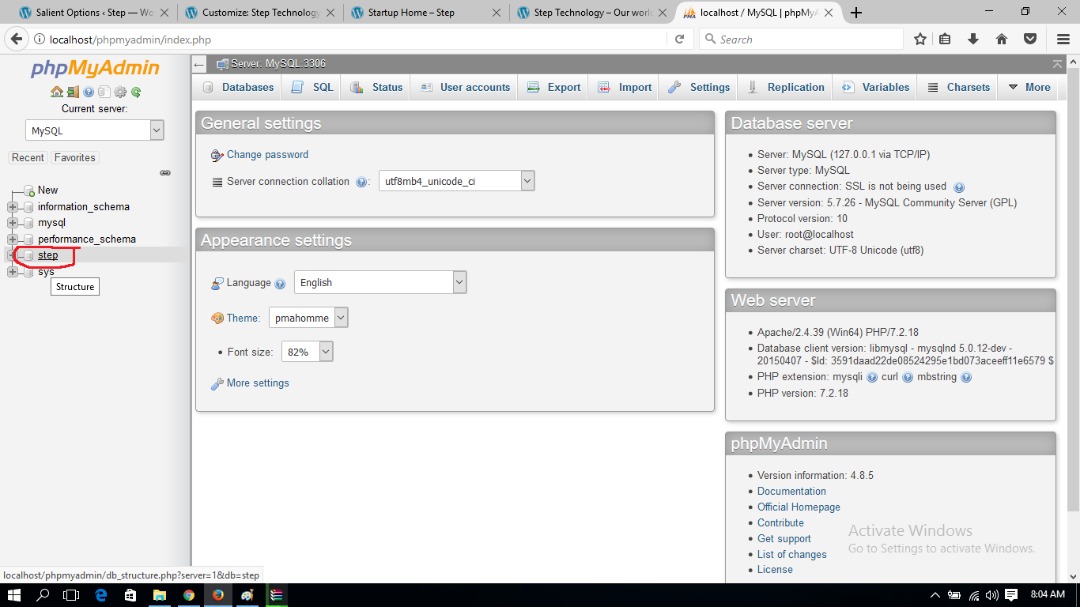
In the above image, I used “step” as the name of my database.

This should show up if you follow all the instructions
correctly. Proceed by clicking on

Add the database name as “step” and username as “root”, leave password empty for now.

You can use any username and password of your choice and
always add a working email for password recovery.

If you did everything well and got to this page, then
congratulations. You are done with the setup.
Now go to your browser and type http://step.local/wp-admin and login
using your username and password you used during the Wordpress setup.

This
is Wordpress dashboard and it is what you should see once you login.
CUSTOMIZING YOUR
THEME
There are already designed templates by professionals, you
can get them from https://themeforest.net/
For this article I will be using one I already bought called

Click on “appearance” and select

Upload the theme of your choice here and activate it.

Now go to appearance > Install Plugins, install and
activate all the plugins with required and recommended.

After installing the template, you can see it showing, I
circled it Yellow.
Select and chose “Import Demo data” (Demo Importer)

You will see this depending on the template you are using,
importing demo data, and demo data is an already pre-designed website from the
template.

Go to


Set the homepage to a static page and chose the pre designed
home page from the drop down.

Still on the “customize tab” select

You can see the details as circled in the image above.

Now on your browser in your computer type http://step.local, the image above should display
if you did everything very well.
At this stage the website is set up on your computer system.
You can now do other setting like changing the images and the write ups of the
website to your taste.
FOR YOU TO HOST YOUR
WEBSITE ONLINE, FOLLOW THE PROCEDUE BELOW
For foreign hosting company, I use Namecheap, and for Nigerian hosting I use
Syskay.com but you can use anyone you
like.
On your browser go to http://localhost
At the bottom left corner select
Select the database

Click on

Click on

Save file
Now go to “www folder” in the “wamp” , select the step folder.

Right click and make it a zip file or compress it. Make sure
that you have a software that can be used to compress files or to convert
folders to zip file. You can download the software that you can use to compress
files to zip here if you don’t have one.
NEXT WE NEED TO
UPLOAD THIS ZIP FILE TO THE HOSTING ACCOUNT ONLINE TO MAKE THE WEBSITE LIVE
For you to upload the website to an online hosting account
to make it become live, you need to first of all buy a “domain name” and a
“hosting account”. You can buy one here Namecheap
or Syskay.com.
Once you’ve bought a domain name and have a hosting account,
you can now follow the below steps.
Go to the hosting company that you registered with and login
into the cpanel (Control Panel), the login details will be sent to you after
you pay for hosting.

When you login to the cpanel, select

Go to public_html

Click on the upload
This is the place where you upload the “step” zip file

Go back to cpanel and select “mysql database”

Create a new database, see how it’s done.

Now create a new user. I always use password generator for
creating strong secure password. I will advise you to do so.

Add a new user to link up with the database you created
earlier.

After adding user, it will bring you here, select all the
privileges.

Then go back to cpanel and select phpmyadmin.

Select the database you created few steps back.

Select the import function to import the sql file you
exported few steps back

This is what the import looks like.

If the import was successful, select the “wp_option”

See the changes you need to effect:

For this article, I’m using a subdomain website
noblecontracts.com so the site url is https://www.noblecontracts.com/step
You can see that the file is done uploading, select it and
chose


After the extract, select the file “wp-config.php” right click on it and
choose edit.
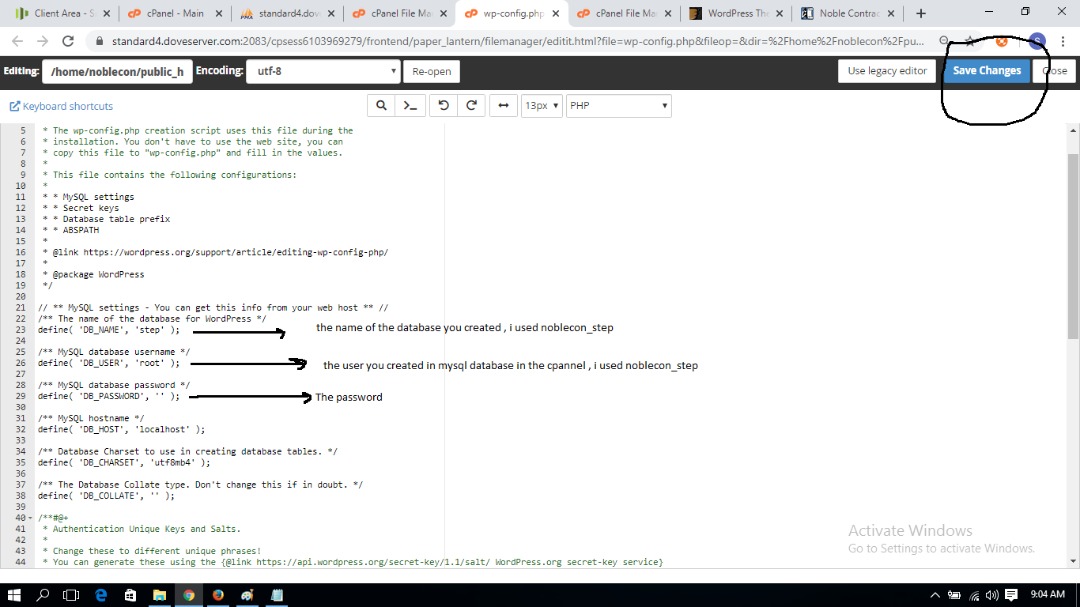
Editing the “wp-config.php”, you can see the changes that needs to effect.

Now type the url on your browser. Congrats, the website is
now live and visible to the whole world now.
This is the end of the basic training on how to design a
website using WordPress. Thanks for reading. Use the comment section below to
ask questions if any.


)
0 Comments
Disclaimer: Opinions expressed in comments are those of the comment writers alone and does not reflect or represent the views of Jonaky Blog.